AI video thumbnails tools scan your video and pull out high-contrast and emotionally expressive frames then auto-generate or composite poster images and short trailers across your entire catalogue without anyone touching it manually. The whole point is a measurable lift in click-through rate on your browse rows, because that thumbnail is genuinely the single biggest factor in whether someone clicks play or keeps scrolling.
Here’s a workflow that actually holds up pull candidate frames automatically, score them for faces, composition and text safety, spin up localised title-card variants for different markets, then run the winners against whatever you’re currently using in an A/B test. Not a theoretical pipeline. Something you can actually measure and improve on every single release. What used to be a design bottleneck that slowed down every new title becomes a pipeline you can actually run at scale and measure properly.
One thing that doesn’t change though: keep a human review step in there for brand and rights safety. The AI doesn’t know what it doesn’t know and that’s exactly where the expensive mistakes happen.
By the Flicknexs team. We build white-label OTT/VOD/IPTV streaming platforms, so this is written from hands-on streaming-platform experience.
Your catalogue can be genuinely great and it still won’t matter if the artwork sitting in a browse row is dull, muddy or generic. Viewers don’t give it a second look. They just scroll.
Thumbnails and short trailers are the storefront of an OTT service and most operators underinvest in them badly. The reason isn’t laziness, it’s math. Fresh art for every title, every language, every device aspect ratio is slow and expensive when you’re doing it by hand. At any real catalogue scale it becomes a permanent backlog that never clears.
That’s exactly the kind of high-volume, repetitive creative work where AI has quietly gotten pretty good. Not perfect but genuinely useful as long as you build the right guardrails around it.
Why thumbnails and trailers move the needle
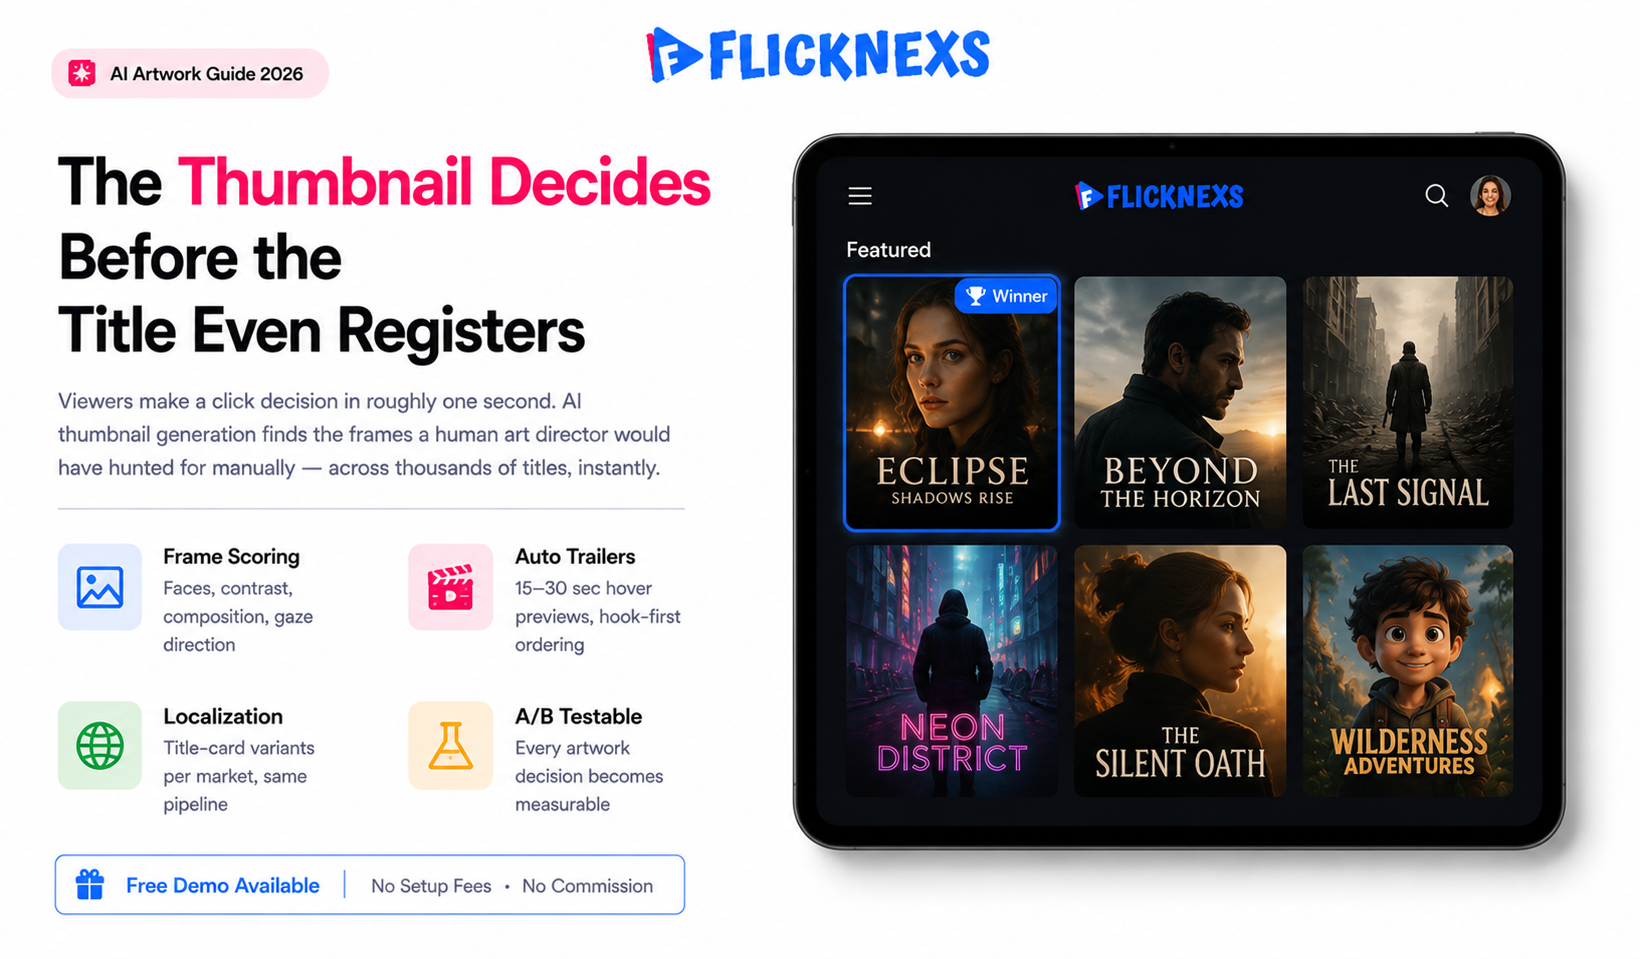
On a grid-based OTT home screen, a viewer makes a click decision in roughly a second. The artwork carries almost all of that decision weight. The title text is small the synopsis is hidden behind a tap and the trailer only plays after a hover or click. A muddy poster frame or a subject looking away and that title loses to whatever’s next to it in the browse row, regardless of how good the actual content is.
There’s solid research behind this too. Visual attention studies consistently show that faces, direct eye contact and high-contrast focal points are what the eye goes to first, every time.. That is the principle AI thumbnail tooling exploits. It finds the frames a human art director would have hunted for manually and it finds them across thousands of titles in a fraction of the time.
The two distinct jobs: stills and motion
It helps to split the work into two pipelines. The thumbnail (still) pipeline produces the static poster and tile art for browse rows, search results and recommendation shelves. The trailer (motion) pipeline produces the short auto-play preview that runs on hover or on the title detail page. They share frame-analysis tech but chase different targets. A thumbnail optimises for a single click; a trailer optimises for “keep watching past three seconds.”
How AI video thumbnails actually get generated
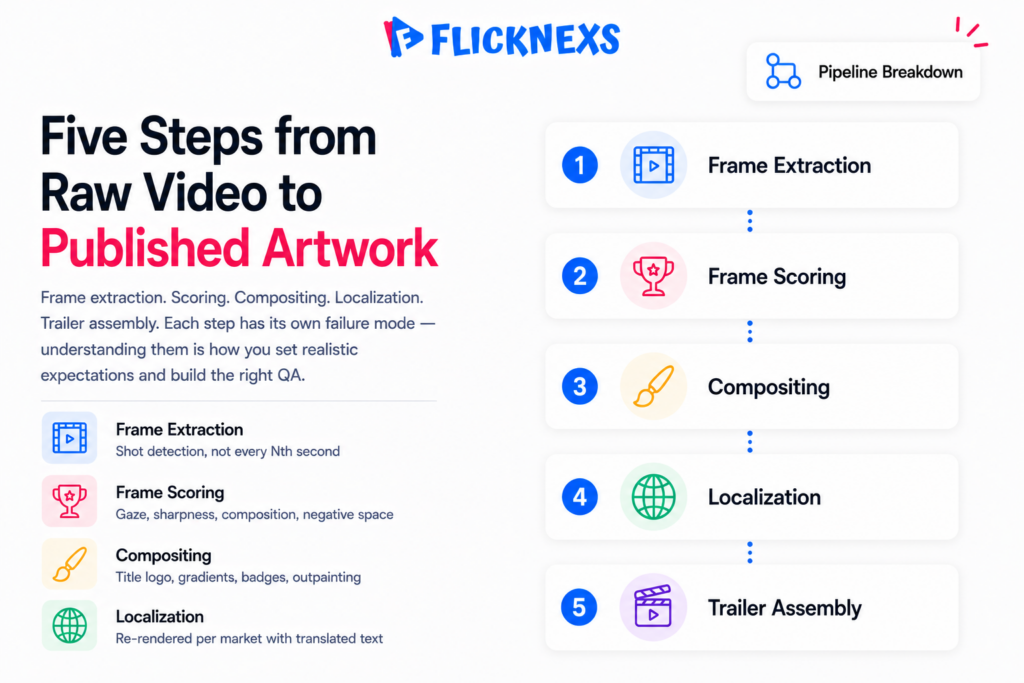
There is no magic single button. A production-grade pipeline chains several steps together and understanding them helps you choose tools and set realistic expectations.
Step 1: Frame extraction and shot detection
The system samples frames across the runtime and runs shot-boundary detection, so it is choosing candidate frames from distinct scenes rather than near-duplicates. Sampling every scene change rather than every Nth second produces far more varied candidates.
Step 2: Frame scoring
Each candidate gets scored on signals like face presence and size, gaze direction, sharpness/blur, exposure and contrast, rule-of-thirds composition and whether there is clean negative space for an overlaid title. Frames with motion blur, closed eyes or end-credit text get penalised. One thing that bites teams in practice: the scorer loves a sharp, well-lit close-up, which means action titles full of fast camera moves often surface weaker candidates than a quiet drama. You end up tuning the weights per genre, not once for the whole catalog.
Step 3: Title-card and overlay composition
The winning frame gets composited with the title logo, a readability gradient and any badges (New, 4K, Original). Generative models can extend backgrounds (outpainting) to fit a wide hero banner from a tall poster or clean up a busy edge so the title text stays legible.
Step 4: Localization and variants
The same frame is re-rendered with translated title text and culturally appropriate emphasis. This pairs naturally with the rest of your localization stack. See our guides on AI dubbing for OTT and AI subtitling and auto-captioning.
Step 5: Trailer assembly
For motion previews, the system selects the highest-scoring short clips, orders them for a quick hook, trims to a target length (often 15 to 30 seconds for hover previews) and can add a music bed and a closing title card. The same scoring that ranks still frames helps rank clip segments.
Build vs buy vs platform-native
Operators generally pick one of three paths. The right choice depends on catalog size, in-house engineering and how much you want to own the model layer.
| Approach | Best for | Pros | Cons |
|---|---|---|---|
| Manual design | Small, premium catalogs | Full creative control; brand-perfect | Slow; expensive per title; doesn’t scale to localization |
| Standalone AI tools / APIs | Teams with engineering resources | Flexible; best-of-breed models; pay per use | You build the glue, review UI, and A/B harness yourself |
| Platform-native automation | Operators who want it to “just work” | Integrated with ingest, CMS and player; testable in one place | Less low-level model control than a custom build |
On a white-label platform like Flicknexs, the value is that thumbnail and trailer automation sits next to ingest, your CMS, your player analytics and your metadata. Generation, review, publishing and measurement happen in one loop instead of three disconnected tools.
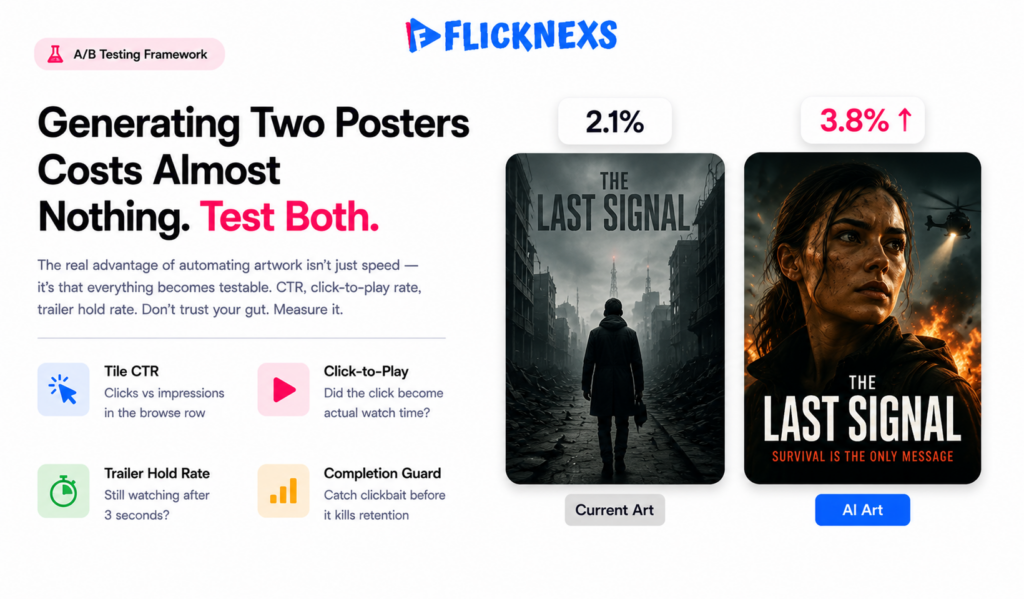
Measuring the lift: don’t trust your gut
The real advantage of automating artwork isn’t just speed, it’s that everything becomes testable. Generating two posters costs almost nothing, so there’s no reason not to run them against each other. Set up an A/B test or a multi-armed bandit that serves different artwork to comparable audience segments and tracks both click-through and whether people actually finish watching after they click.
Metrics that matter
- Tile CTR: how many people clicked the title out of everyone who saw it in the row.
- Click-to-play rate: did that click actually turn into someone watching or did they just hit the detail page, look around for two seconds and leave. Two very different things and most dashboards don’t separate them clearly enough.
- Trailer hold rate: of the people who got the auto-play preview, how many were still watching after three seconds. If that number’s low, the opening frames aren’t doing their job.
- Completion / retention: the ultimate guard against “clickbait” thumbnails that win clicks but lose trust.
A caution on numbers. Published CTR-lift figures vary enormously by catalog, audience and baseline quality, so treat any single headline percentage with skepticism. The honest framing is that better artwork reliably moves CTR for under-served titles, but the size of the lift is something you have to measure on your own catalog. There is no universal multiplier. And watch the second-order effect a flashier thumbnail can lift CTR while quietly dragging down completion, because you pulled in viewers the title was never going to satisfy. That is why click-to-play and retention sit in the same dashboard as CTR, not in a separate report nobody opens. For the methodology behind sound experiment design, Google’s web.dev guidance on measuring real user metrics is a useful grounding, and the general concept is well summarised on Wikipedia’s A/B testing article.
Quality, brand and rights guardrails
Automation without guardrails is how you end up with a spoiler frame, a competitor’s logo in the background or a generative artifact (an extra finger, garbled text) on your home screen. Bake these checks into the pipeline.
Spoiler and safety filtering
Exclude frames from the final act, end credits and any scene flagged as graphic. A simple rule, never pick a frame from the last 15% of runtime, prevents most accidental spoilers.
Human-in-the-loop review
Keep a lightweight approval queue. The AI proposes the top three frames and a composed poster; a human approves or rejects in one click. This preserves brand control while still removing most of the manual labour.
Rights and provenance
If you use generative outpainting or AI-extended backgrounds, log which assets were AI-modified so you can answer rights questions later. Pairing AI thumbnails with accurate AI metadata tagging also helps the recommendation engine surface the right tile to the right viewer in the first place.
A practical rollout plan
- Start with your worst performers. Pull the titles with the lowest tile CTR. They have the most headroom and the least risk.
- Generate three candidates each and route them through human review.
- A/B test the AI art against the existing art for two to four weeks per cohort.
- Promote winners, archive losers and feed the result back so the scoring model learns your audience’s taste.
- Expand to localization and trailers once the still pipeline is proven on your own data.
Treat it as a continuous loop, not a one-time batch. Audience taste and your catalog both change, so re-test seasonally.
Frequently asked questions
Related guides
- OTT growth and AI content hub
- AI Dubbing for OTT: Localize Your Video Library in Any Language at Scale
- AI Subtitling & Auto-Captioning for Streaming: Accuracy, Cost & Compliance
- AI Metadata Tagging: Auto-Organize Your Video Catalog for Discovery
Planning your own platform? Learn how to create your own OTT platform with Flicknexs — VOD, live, DRM, multi-device apps and hybrid monetization.


Leave a Reply